Tuesday, July 31, 2007

Drywall!


This weekend, we tackled rounding out an arch in the mudroom doorway. We wanted it to match the arches in the doorways into the living room. We also worked on finishing out the drywall in the mudroom. B measured out the opening, did some quick math (quick because he's genius with that stuff), and inserted some supports at strategic spots to keep the thin ply equidistant.


Here's a closeup of the arch. When we hung the sheet of drywall on the mudroom side, B made sure to leave it long so he could scribe it out after the arch was completed.


The next step was forming a piece of drywall to fit. B had me cut a piece the same size as the ply, then wetted it down with a sprayer filled with water. It still wouldn't flex enough so B scored the back of it in one inch sections along the parts with the most bend. Then, with some gentle coaxing, he eased it into place, and voila!

A pretty arch!


We finished out the rest of the arch in drywall and ended up patching up the rest of the wall because of some overzealous sledgehammering of the window opening. That was my fault. It's hard to stop once you start.

Anyhow, here's how it looks now with a coat of mud on it.

We're hosting a summer picnic/bonfire for my store in our backyard next weekend. Here's hoping this week and this weekend will give us the opportunity to really press and get a bunch of things buttoned up. I want to get it sanded and primed by the 11th. Hopefully the mudroom will be painted and ready to go, except for the flooring and closet with built-ins. That'll give me a day to frantically clean the place and try to tame the chaos and general household anarchy.

Sigh. Soon it will be fall, and in addition to trying to finish off all of these projects, we still need to make a serious effort to make sure we get the house painted this fall. I think we're hoping to do it the first part of September. This means a lot of the indoor stuff will be set aside for a while, and we'll shift gears back to finishing the last of the scraping, replacing the last of the cedar shake that needs replacing, hanging new trim, priming, and painting. Phew. When-oh-when will we be done?!?
Anyhow, that's about it for the backlog of stuff.
Yay!


Coming soon: some crafty blogs!!!! I promise you pictures from the Knit-A-Thon! and the partially restored Pinball machine B's been working on...

Mudroom!


Well, it was a window in our dining room. We took out the window and framing, and now, thanks to S, it is our new doorway into the mudroom.


Here it is with the rough framing (and oodles of debris and assorted de/con/struction instruments.


B got the drywall done before he left for Dallas. I have the distinct feeling this is going to be my spot. I keep wandering over into the room on Saturday morning with a cup of coffee. I stand there and stare out the window into the yard, and just breathe peacefully and think of Burke. After watching the squirrels, thinking over the supplies list for that day's trip to the Home Despot, I'll move on.


The great thing about the new back doors is that the blinds are sandwiched between the layers of glass. No one will ever have to dust those suckers! Yes, I love them dearly.

new back porch

I'm determined to get caught up with the remodeling photos so I can send out this link and update our dear friends and family as to what we're up to. I know they must think we've fallen off the face of the earth...

So here it goes: the new back porch!


B removed some of the decking on the corner of the landing. They decided to use the circular saw to add some detail to the top of the pillar.


And there they go, getting ready to raise the 6x6 pillar. "Ahem," notice the similar hands-on-hips-pose. Like father like son...


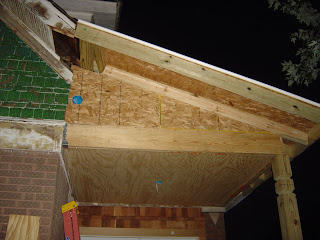
Unfortunately, I didn't take any more shots until that night, after the structure was done! Can you believe it went up in one day!? Unbelievable. This shot shows how they tied it in with the existing trim/etc. The ceiling is bead board to tie in with the eaves and the ceiling in the former back porch-now mudroom. It's a little hard to see the notch detail since it's so dark. Look closely, though, and admire!


I took this shot the other morning, now that the trim is all up. This weekend I stained the ceiling bead board to match the mudroom ceiling. The roof line still looks a little cockeyed, but as soon as we get the new gutters on and shingle the new portion of the roof, it'll look level. Until then, we'll have to just ignore the slope-that's-really-not-there.

Saturday, July 28, 2007

The Official Second Bath!

Yay! The camera card just arrived in the mail! I joyfully skipped downstairs and unloaded it all, so we're back in business...


Okay, so here's some photos of the basement bath. And yes, I did it myself! Here's the ceiling, tiled my moi, with the can light covers installed. I still have to go back and clean it all again. I used square 6-inch white gloss finish tiles and white grout to keep it light and unobtrusive. I have to admit you don't even notice it when you first walk into the space. The walls are tiled in 3x6 white gloss subway tiles.


And then here's a view of B's tower with the shower with most of the hardware installed. Notice the lovely tiling around the window, the pebbles on the back of the built in shampoo and soap nooks! And the hand shower for ease of cleaning and for the dogs when it's bath time.

The grout dried a lot lighter than I thought it would. We used "delorean gray" grout (I think B agreed to the color just because of the cool name) that appeared on the sample to be a deep hue. When it dries it looks a lot lighter, more of a pale silver gray.


...and then there's the floor... maybe that's why visitors to the house don't notice the ceiling. The back story on this is that I saw this awesome pebble tile in the marble store in Northside, and decided I wanted it. They were mesh tiles, like any other mosaic mesh, but with pebbles attached. It looked so amazing, and I figured with the unevenness of the floor, it would work with the slope rather than against it. Great, I thought. One big decision made! And so unique! At least I kept thinking this until I found out it averaged about $18 a square foot, then there would still be a shipping fee. Eep! We had about 37 sf to cover, and a budget, of, well, not that much. Definitely not an option.

So, weeks go by and I can't let go of the idea. I keep coming back to it. So, after laying the rest of the tile and getting comfortable with my skill level, I decided I'd just do it myself. I bought a load of gravel for $12.50 from the stone yard, my dad gave me several five-gallon buckets of tumbled quartz stone from a landscaping job he did, and I got started laying them myself. The part that took the longest was sorting out all the broken, chipped and oblong ones. I'd sort a batch, then go down and attach them with thinset. You can see how it looked on the lower left corner of the photo. I also mixed in some glass discs I bought at Michaels from the floral department for $10. Then, after the whole floor was done, I grouted 'em. It took a LOT of grout, even with them laid so tightly together.


Here's a close up of the final product! For a HECK of a lot less!!! $22.50 in stone and glass, about $15 in thinset, and about $36 for three bags of sanded grout. Walking on it is fun: it feels like you're wearing a pair of those rubber shoes with nubs on the insides. It turned out relatively even! It did take a while, was incredibly repetitive and painstaking, but I must admit it was a lot of fun. But maybe that's just my OCD talking. I want to do another. Soon.

Wednesday, July 25, 2007

Back from Dallas

Well, I'm back from visiting B in Dallas. He is there for two (count 'em, TWO) weeks of training for his job, so I flew down to distract him for the weekend. It is really strange to sit around on the weekend and not be tearing something apart or constructing something. We both kept thinking about the house and what needs to get done next. B briefly considered remodeling the hotel room, but it was decided that they wouldn't look favorably on us knocking down some adjoining walls and I doubt they'd appreciate me retiling the entire bathroom in mosaics. Wussies.


The flight home was okay, but getting there was a nightmare. My connecting flight on Tuesday from Chicago to Dallas was canceled because of lightning and storms and I had to spend the night on the floor behind a terminal desk. Then there was the struggle to reschedule. The phone number they gave us was busy, the kiosks were of no help, and the "Customer Service" line was about 100 people deep. By the time I got up there, they told me they wouldn't be able to get me on a plane until sometime Thursday afternoon. Sigh. I told them I'd try standby. So, the next morning I did make the 8:30 am flight (another flight into Chicago got delayed) so I made it to DFW at 12:30pm Wednesday instead of 9:30pm Tuesday. Ack.


So, our long weekend consisted of sitting by the hotel pool, getting the new Harry Potter and furiously reading, visiting my aunt in FW, going to the movies, hanging out with my mom, eating and drinking, and general lolly-gagging about.


And now it's back to work on the house: sanding the mudroom and priming the walls and trim. I'll post some more photos as soon as we get our card for the camera or I buy a new one.

Tuesday, July 10, 2007

Knit-A-Thon!

This Saturday is the first Knit-A-Thon I'm holding. Not sure how many folks are going to be coming, but I'm excited in any case. I got a huge batch of yarn donated (I'd take a photo of the spectrum, but we left our camera card at the inlaws. Soon it will be delivered. Soon I will be able to share). Anyhow, I've got a few patterns for beginning knitters, some for more advanced folks, and a few crafts for the non-knitters, mostly tags that need making and some fabric ghosties that need assembling and have their hearts sewn on. I borrowed a serger, but am quickly running out of time to get the squares and circles cut and edged. Ah, well! I'll do the best I can. The next one in September will be better organized.
Looking through the websites that have good patterns for NICU babes is breaking my heart. I think this is part of the reason I am not getting things together as quickly as I would like. It takes so much emotional energy to navigate through them.
Sigh.
When they say it takes time to heal, they really mean it. There is nothing to do but work through it. There are no shortcuts through grief.

That's it for now.
-G

Countertop Part II

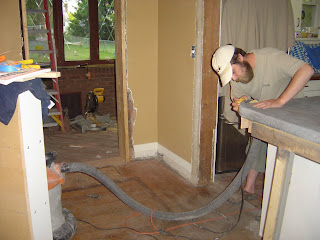
Here we go... now it's SANDING time!!! B started sanding it a couple of days after we took the form off. Here he is hitting the rounded corner. He left the support of the bar side in place for several extra days, just in case.


In this view you can see the new doorway into the new mudroom. We tore out the window that was there in order to make the opening. I like sledgehammers. The new window overlooking the back yard is so beautiful. I keep standing in the new doorway staring out into the trees.


B dry-fitted the new sink in place to see what it was beginning to look like. The black dye we used made a LOT of black colored dust. On everything. Even with the orbital palm sander attached to the shopvac. I would hate to see what the place would look like if he hadn't done that! Yikes! I think this was taken on the final skim coat to fill in the last of the little pits and flaws.


And here is what it looks like after it's been sanded like crazy and with a couple coats of penetrating sealer and topcoat. The extra supports holding up the bar end and the surrounding lip have been removed. B used buffing compound and car wax with a nice car buffer to get the glorious sheen you see. Even M likes it (that's him sniffing the front)!

Wednesday, July 4, 2007

Construction

Here are some photos from the concrete counter construction:


Here's the form, made of melamine board. The melamine board has a plastic coating that kept the concrete from sticking to it. They added 2x4 braces to the front "bar" area to help support it while the pour was happening.


You can see the rebar and mesh embedded in the mix. All in all, it took all day to build the form and get it poured and smooth.


Here's a good view from the kitchen into the dining room area. Notice the missing wall! The wood slab on the counter is actually a form to mold an opening where the sink will go, the opening below is for the dishwasher. As soon as the concrete was pretty well set, the boys took the sides of the form off.

Next post: Finishing the concrete!